New Websites in Bangkok
This is worth it:
This is worth it:

Several people requested a manual for this. A Raspberry is very wel suited to be used as a proxy server so you can use your home IP as a residental proxy in social media software.
Choosing a Raspberry:
Above you see the Raspberry 3b. The first thing you notice are the 4 (normal size) USB ports, the ethernet port, a micro USB port for power and a normal size HDMI port. This Raspberry has everything we need.
There are also other Raspberry’s we can use. Below you can see the Raspberry Pi Zero.
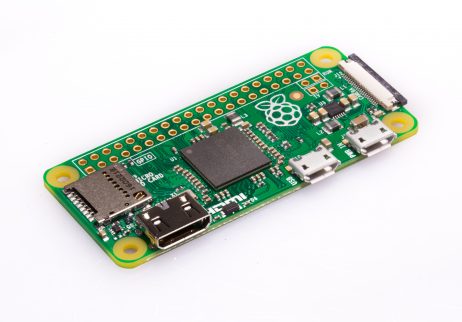
There are 2 versions, 1 with and 1 without WIFI. I use several of these myself. The one without WIFI can be used together with a “Micro USB 2.0 RJ45 Ethernet LAN Network Adapter 100 Mbps” like the one below.
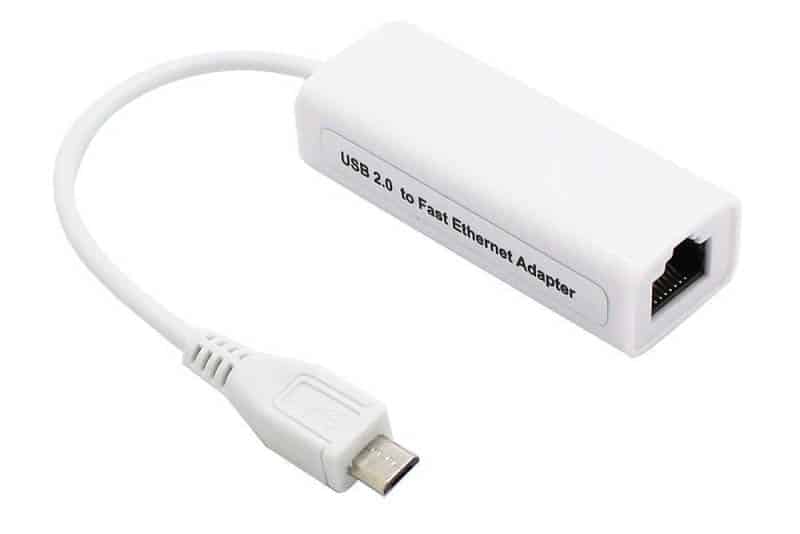
I buy them on Aliexpress. They are cheap, usually about $4. If you buy them make sure that your adapter is supported by Linux. The ones with a chip called “RTL8152” are supported. A direct link (which works at this moment) is: https://nl.aliexpress.com/item/Micro-USB-2-0-To-RJ45-Ethernet-LAN-Network-Card-Adapter-100Mbps-For-Tablet-PC-For/32685366475.html
If you look at the Raspberry Zero you will see that the setup is more complicated and you need some extra adapters and cables. The HDMI port is small, you will need an adapter to connect it with your monitor. There are also only 2 micro USB ports. One is used for power. The other you need to connect your network adapter and keyboard. For this you will need a USB HUB (powered).
What to choose?
The Raspberry 3b is easy to setup. But with a price of $35 not the cheapest option. The Raspberry Zero’s are cheaper, the one without WIFI is about $5, the one with WIFI is about $10. But the Raspberry Zero is more difficult to setup and you need a lot of extra adapters and cables. If you are planning to use only 1 Raspberry I advice you to choose the Rasberry 3b. If you are planning to use a lot of Raspberry’s it can be worth it to invest in all the extra things you need for the setup of the Zero.
In this manual I will show you the setup of a Raspberry 3b.
Note: I assume that you are able to use SSH and a Linux text editor.
The Raspberry boots from a Micro SD card. For this you will need a bootimage called NOOBS. My supplier sells SD cards with NOOBS already on it. If your supplier doesn’t you can do it youself and use this manual: https://towardsdatascience.com/raspberry-pi-3-for-the-first-time-50634b115620 The part you need starts with “Format your micro SD card (FAT format)”.
I connected the Raspberry with a HDMI cable to my monitor, a keyboard, mouse and an ethernet cable are also connected. The micro SD card with NOOBS is in the card reader. Connecting the power supply will let the Raspberry boot.
I was surprised. My Raspberry booted directly without questions. I remember from the past that I was able to select if I wanted to install the desktop or not. Anyway, I have the desktop in front of me. You can check if everything works correctly by visting some websites using the browser.
The desktop is something you do not really need if you want to use the Raspberry as a proxy server only. But if you have more plans it can be a nice thing to have.
First we are going to enable SSH and change the password. We open the terminal (option in the top bar). There we enter the command:
sudo raspi-config
In advanced options we enable SSH, and in the same list we see the option to change the password.
After doing this we can remove the HDMI cable, the keyboard and mouse from the Raspberry. We will continue the setup using SSH.
Port forwarding in the ADSL/Cable modem/router.
Our setup will look like this:
Server or VPS with social media software -> Internet -> ADSL/Cable modem/router at home with external IP 123.123.123.123, internal IP 192.168.178.1 and port forwarding enabled -> ethernet cable -> Raspberry with internal IP 195.168.178.234.
It is a bit hard to explain, the setup will depend on your modem. Mine looks like this:
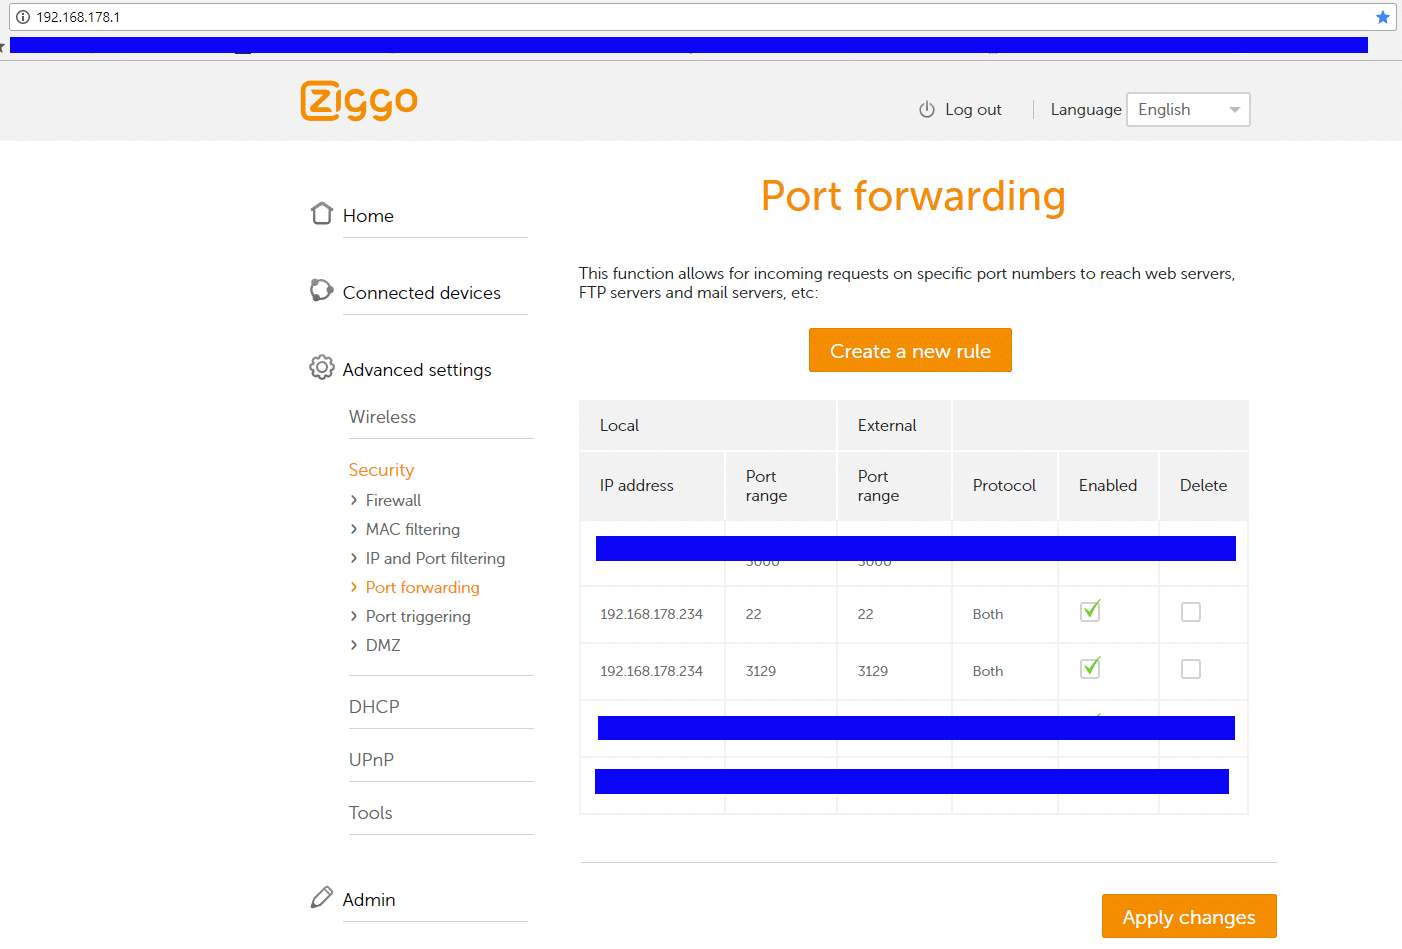
As you can see all incoming traffic to ports 22 (SSH) and 3129 (the proxy) are forwarded to the internal IP of the Raspberry. In addition I also made this IP a “Reserved IP addresses” in the DHCP section of the modem.
On https://portforward.com/router.htm you can find the right way to setup port forwarding in different routers.
Now we should be able to login to the Raspberry from our Windows computer using SSH!
I use the Bitvise SSH client. It is free and works fine. We connect to the IP of our modem 123.123.123.123 with SSH using the login name “pi” and the password we configured before.
Install 3proxy:
-First update your software with the commands:
sudo apt-get update
sudo apt-get upgrade
-install an editor. I love joe.
sudo apt-get install joe
To install the other software we need to enter the commands:
sudo apt-get -y install fail2ban software-properties-common

sudo apt-get install build-essential libevent-dev libssl-dev

cd /etc

sudo wget https://gettraffic.pro/docs/3proxy-0.8.11.tar.gz

sudo tar zxvf 3proxy-0.8.11.tar.gz

sudo mv 3proxy-0.8.11 3proxy

cd 3proxy
We have to edit proxy.h with the command;
sudo joe src/proxy.h
Here we add the line:
#define ANONYMOUS 1
You can put it above the other lines starting with #define
Compile and install the software:
sudo make -f Makefile.Linux

sudo make -f Makefile.Linux install
Download 3proxy.cfg
sudo wget https://gettraffic.pro/docs/3proxy.cfg
We have to edit 3proxy.cfg:
sudo joe 3proxy.cfg
Change the line;
users root:CL:passwd
Where you replace the word passwd with the password you want to use for your proxies. This can be another password than the password you use for logging into your Raspberry.
You can delete all the lines starting with “proxy” and replace them with 1 line:
proxy -p3129 -a
I commented out the logging part, to save the SD card.
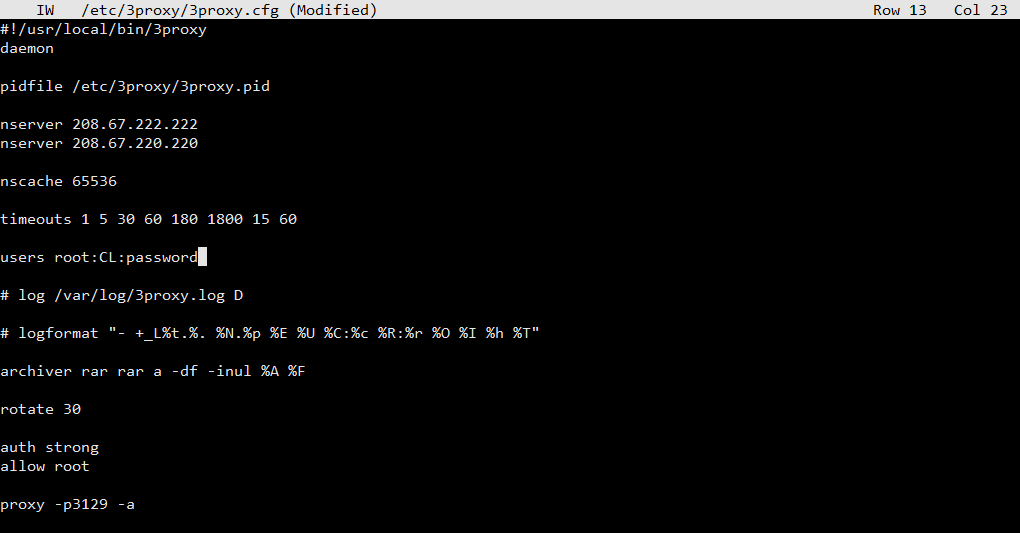
Finally your 3proxy.cfg will look like this:
change the permissions of 3proxy.cfg with the command:
sudo chmod 700 3proxy.cfg
Setup/Download the other config files:
cd /etc/3proxy/scripts/rc.d/

sudo mv proxy.sh saved-proxy.sh

sudo wget https://gettraffic.pro/docs/proxy.sh
Now we can start our proxy server with the command:
sudo sh /etc/3proxy/scripts/rc.d/proxy.sh start
It should give the output “Starting 3Proxy”. If it doesn’t then there is a problem somewhere in your config files.
Let’s add it to autorun, so after a reboot of your Raspberry it will run by itself:
sudo joe /etc/rc.local
and add line:
sh /etc/3proxy/scripts/rc.d/proxy.sh start
This line has to be added above the line “exit 0”.
The best way to check if everything is alright is by doing a full reboot of your Raspberry and checking if everything still works after the reboot.:
sudo shutdown -r now
And that is it!
You can use your proxy with port number; 123.123.123.123:3129
In the example I used the port number 3129. It can be better to change it to something else. Of course you will have to change it everywhere, in the modem with port forwarding, in 3proxy.cfg etc.
Some people have home IP’s which are not static. After a reboot the IP will change, and you will not be able to connect to your Raspberry anymore. Fortunately there is a solution for that. We will use no-ip.com to make a domain name and update the DNS with a script every time our IP changes.
-Make an account at no-ip.com
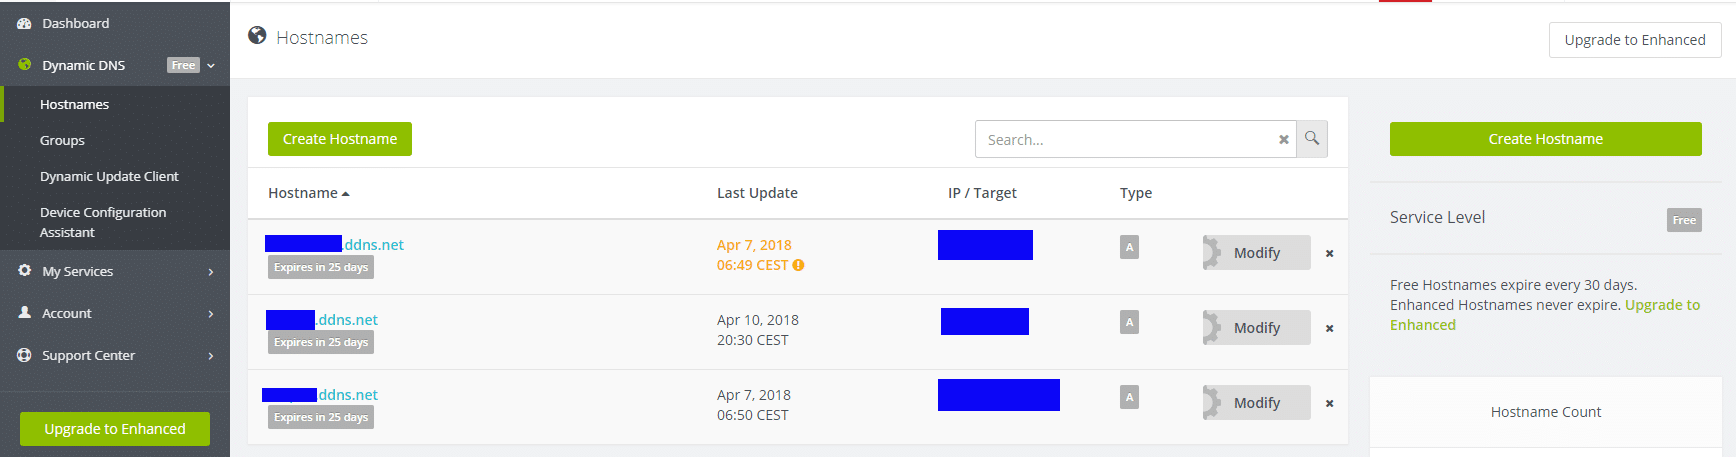
-Create a hostname like “abc123.ddns.net”
It will look like this:
After this you can install a script on your Raspberry that will update the DNS at no-ip with your changing home IP. The manual is on https://www.noip.com/support/knowledgebase/installing-the-linux-dynamic-update-client-on-ubuntu/
Now you will be able to use your proxy with abc123.ddns.net:3129

Here a short tutorial about how to setup your own proxies with 3proxy.
The tutorial assumes that you know how to use a ssh client, and that you know how to use it to setup a session to your vps. It also assumes that you already made a vps, received the main ip, some extra ip’s, and the root password to login.
On your vps you have to install Ubuntu 16.04. So not 14.04, Debian or something else. Please note that there is a big difference in for example the networking setup of Ubuntu 14.04 and 16.04. I am always willing to help, but if you install something else than Ubuntu 16.04 you will be on your own…
The server I will setup has 3 ip’s. The main one is 000.000.000.000 and the 2 extra ip’s are 111.111.111.111 and 222.222.222.222.
-login to your vps with ssh.
-change your password with the command:
passwd
-update your software with the commands:
apt-get update

apt-get upgrade
-install an editor. I love joe.
apt-get install joe
-Now we are going to setup the networking part. This involves editing the file /etc/network/interfaces. First we will make a backup of the original interfaces file:
cp /etc/network/interfaces /etc/network/interfaces-saved
Open the interfaces file in the editor;
joe /etc/network/interfaces
Empty the file completely. With joe you can use CTRL-Y to delete lines.
copy/paste this into your interfaces file (ofcourse without the —– lines):
———————————
# The loopback network interface
auto lo
iface lo inet loopback
auto ens3
iface ens3 inet dhcp
iface ens3 inet6 auto
iface ens3 inet static
address 111.111.111.111/24
iface ens3 inet static
address 222.222.222.222/24
——————————-
The above configuration will setup your main IP (is not mentioned but taken care of in the auto, dhcp part) and 2 extra ip’s 111.111.111.111 and 222.222.222.222
Ofcourse you will have to change this to your own ip’s. Do not forget the /24 at the end. If you have more than 2 extra ip’s you can add them. Just copy 2 lines for each extra ip and change it to your needs.
The most often made mistake: Some people try to put their main ip also in this file. Forget this ip. The main ip is setup by dhcp, and you do not have to specify it here!
Save your file with CTRL-K X. It will say; “File /something saved”.
We will restart networking so it will load your new config file:
sudo /etc/init.d/networking restart
To install the other software we need to enter the commands:
apt-get -y install fail2ban software-properties-common

apt-get install build-essential libevent-dev libssl-dev

cd /etc

wget https://gettraffic.pro/docs/3proxy-0.8.11.tar.gz

tar zxvf 3proxy-0.8.11.tar.gz

mv 3proxy-0.8.11 3proxy

cd 3proxy
We have to edit proxy.h with the command;
joe src/proxy.h
Here we add the line:
#define ANONYMOUS 1
You can put it above the other lines starting with #define
Save your file with CTRL-K X. It will say; “File /something saved”.
Compile and install the software:
make -f Makefile.Linux

make -f Makefile.Linux install
Download 3proxy.cfg
wget https://gettraffic.pro/docs/3proxy.cfg
We have to edit 3proxy.cfg:
joe 3proxy.cfg
Change the line;
users root:CL:passwd
Where you replace the word passwd with the password you want to use for your proxies. This can be another password than the password you use for logging into your vps.
This will be the setup for a proxy server with the main ip 000.000.000.000 and 2 extra ip’s 111.111.111.111 and 222.222.222.222. These IP’s you configure in the last part;
proxy -p3128 -a -i000.000.000.000 -e000.000.000.000
proxy -p3129 -a -i111.111.111.111 -e111.111.111.111
proxy -p3130 -a -i222.222.222.222 -e222.222.222.222
Replace the 000.000.000.000 with the main IP, the 111…. and 222… with your other IP’s. For every IP you have you can add an extra line.
These lines also configures the port to use, 3128. If you know what you are doing you can change it to something else. It also specifies the nameservers. I used public ones from OpenDNS in my example. Some providers have their own nameservers you can use.
Save your file with CTRL-K X. It will say; “File /something saved”.
change the rights of 3proxy.cfg with the command:
chmod 700 3proxy.cfg
Setup/Download the other config files:
cd /etc/3proxy/scripts/rc.d/

mv proxy.sh saved-proxy.sh

wget https://gettraffic.pro/docs/proxy.sh
Now we can start our proxy server with the command:
sh /etc/3proxy/scripts/rc.d/proxy.sh start
It should give the output “Starting 3Proxy”. If it doesn’t then there is a problem somewhere in your config files.
Let’s add it to autorun, so after a reboot of your vps it will run by itself:
joe /etc/rc.local
and add line:
sh /etc/3proxy/scripts/rc.d/proxy.sh start
This line has to be added above the line “exit 0”.
Save your file with CTRL-K X. It will say; “File /something saved”.
The best way to check if everything is allright is by doing a full reboot of your vps and checking if everything still works after the reboot.:
shutdown -r now
The maintenance for your server is very simple. Every month or so login and update your software with the commands:
apt-get update

apt-get upgrade
And that is it!
When using your proxies do not forget your port. Often you have to use the format: 111.111.111.111:3128. And ofcourse you will also need your loginname root and the password specified in 3proxy.cfg
Troubleshooting:
-If the above doesn’t work you can test your ip’s by doing a ping to these ip’s from your home computer. If they do not work than there are several possible problems. The first is that you did something wrong in the network setup (file /etc/network/interfaces). The second one, often seen at ovh is that they configured routing wrong. There is no need to look at the configuration of 3proxy if your ip’s don’t work and do not respond to a ping.
-You can find the logfile of 3proxy at /var/log/3proxy.log
A couple of additions (on request)
It is also possible to give several users access to the proxies you made. First you add several users:
users john:CL:topsecret
users mike:CL:anotherpassword
users karl:CL:secretpasswd
Specify which users have access to which services. Start with the authentication method (user/passwd) and end the block with “flush”.
auth strong
allow john
proxy -p3200 -a -i46.4.67.200 -e46.4.67.210
flush
auth strong
allow mike
proxy -p3201 -a -i46.4.67.200 -e46.4.67.211
proxy -p3202 -a -i46.4.67.200 -e46.4.67.212
flush
auth strong
allow karl
proxy -p3203 -a -i46.4.67.200 -e46.4.67.213
flush
This way all users will have access to only their own proxies.
It is also possible to use IP authentication:
auth iponly
allow * 192.168.178.87/24
proxy -p3200 -a -i46.4.67.200 -e46.4.67.210
proxy -p3201 -a -i46.4.67.200 -e46.4.67.211
flush
This will allow IP 192.168.178.87 to access the proxies with port number 3200 and 3201.